
Dienstag, 11. März 2014
Combined Voxel - Polygon Rendering
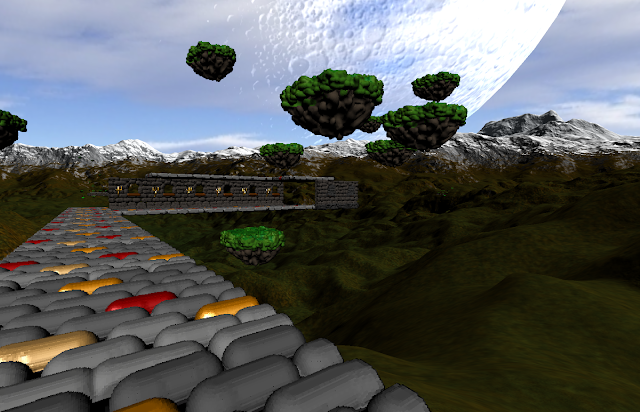
Today I am proud to present the first screenshot of combined voxel raycasting / triangle based terrain rendering of a simple scene. Better results will hopefully follow in the next posts.
Sonntag, 2. März 2014
Skinned Skeletal Animation Tutorial with Source Code
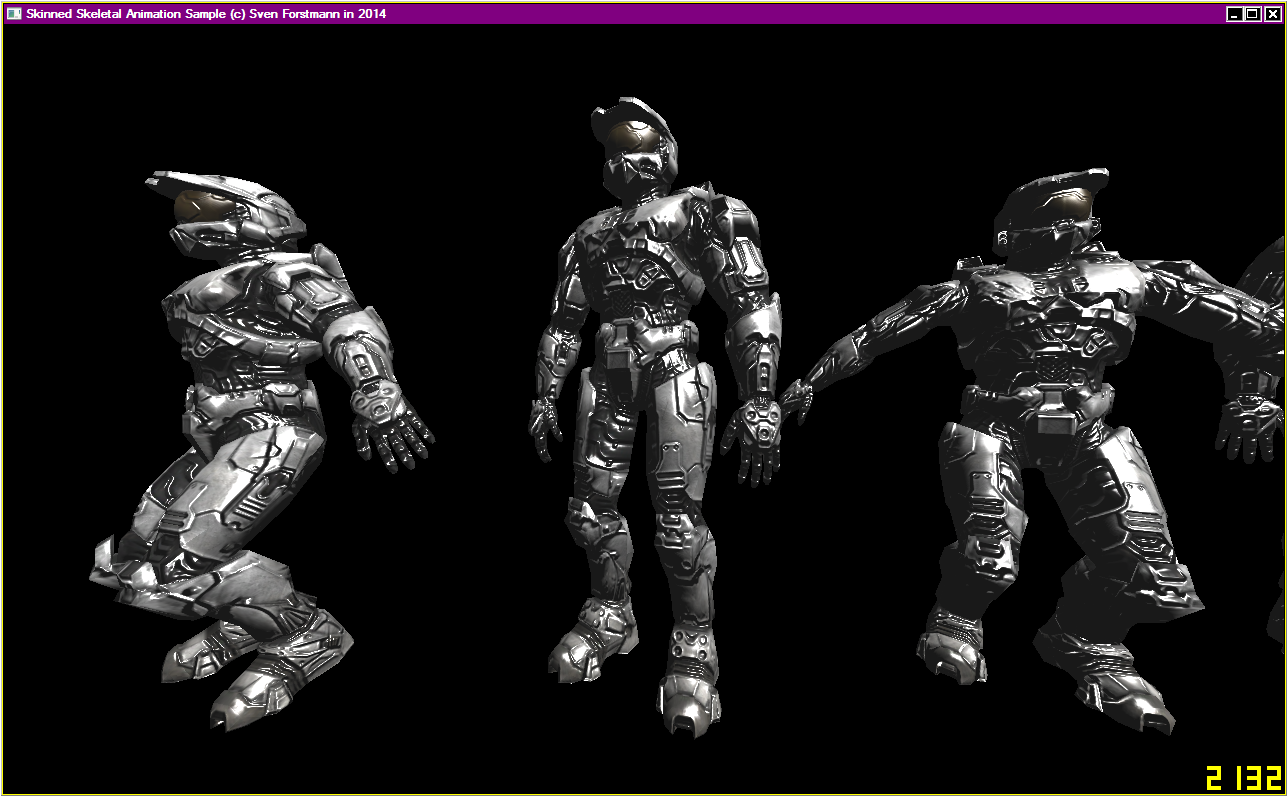
Today I completed a skinned skeletal animation tutorial, which is very helpful if you are just about to start with game development.
Different from the other tutorials I found in the web, this one is very light weight ( < 800 lines for the main mesh & animation code ) and works well with most modeling environments.
DOWNLOAD SOURCE + DATA
Summary
It has the following properties / features:
Also getting a bone matrix to put a weapon in the hand of the player e.g. is very simple:
Setting the arm joint individually for shooting a weapon e.g. works as follows:( press F6 in the demo )
The workflow is as follows:
Different from the other tutorials I found in the web, this one is very light weight ( < 800 lines for the main mesh & animation code ) and works well with most modeling environments.
DOWNLOAD SOURCE + DATA
Summary
It has the following properties / features:
- GPU Skinning / Matrix Palette Skinning
- Bump Mapping (automatic normal map generation)
- Spheric environment mapping
- Ogre XML Based
- Shaders in GLSL
- Visual Studio 2010
- Select LOD level with F1..F5
static Mesh halo("halo.material",//     required material file)
         "halo.mesh.xml",        //     required mesh file
         "halo.skeleton.xml");   // optional skeleton file

int idle = halo.animation.GetAnimationIndexOf("idle");

halo.animation.SetPose(idle, // animation id (2 animations are available)
              time_elapsed); // time in seconds

halo.Draw( vec3f(0,0,0),     // position
           vec3f(0,0,0),     // rotation
        0);                  // LOD level
Also getting a bone matrix to put a weapon in the hand of the player e.g. is very simple:
int index  = halo.animation.GetBoneIndexOf("joint1");
matrix44 m = halo.animation.bones[ index ].matrix;
Setting the arm joint individually for shooting a weapon e.g. works as follows:( press F6 in the demo )
// get the index
int index  = halo.animation.GetBoneIndexOf("joint2");

// get / modify / set the matrix
matrix44 m = halo.animation.bones[ index ].matrix;
m.x_component()=vec3f(1,0,0);
m.y_component()=vec3f(0,1,0); // set the rotation to identity
m.z_component()=vec3f(0,0,1);
halo.animation.bones[ index ].matrix=m;

// re-evaluate the child bones
loopi(0,halo.animation.bones[ index ].childs.size())
{
    halo.animation.EvalSubtree(
        halo.animation.bones[ index ].childs[i], // bone id
        halo.animation.animations[0],            // animation
        -1);                                     // key frame -1 means not use the animation
}
The workflow is as follows:
- Design the Model in Maya/MAX/Blender/etc.
- Export the model using the OgreExporter
- Convert the model from Ogre binary to Ogre XML (batch file is included)
- Load the model in the tutorial code
The Main Skinning in GLSL:
The main skinning is done in the vertex shader and only requires a few lines.
For the shader, the skinning weights are stored in the color information as 3 floats.
The bone IDs are unpacked from the w coordinate of the position information.
The bone matrixes are stored as simple matrix array..uniform mat4 bones[100];
uniform int use_skinning;
void main(void)
{
mat4 mfinal = gl_ModelViewMatrix ;
// skinning
if(use_skinning==1)
{
vec3 weights= gl_Color.xyz;
vec3 boneid = gl_Vertex.w * vec3( 1.0/128.0 , 1.0 , 128.0 );
boneid = (boneid - floor(boneid))*128.0;
mat4 mskin = bones[int(boneid.x)]*weights.x+
bones[int(boneid.y)]*weights.y+
bones[int(boneid.z)]*weights.z;
mfinal = mfinal * mskin;
}
gl_Position = gl_ProjectionMatrix * mfinal * vec4(gl_Vertex.xyz,1.0);
}
Note:
Animating Notes for Maya
For Maya, put all animations in one time-line and export them as separate animations.
Ogre Export
Tangents need to be exported as 4D, to include the handedness. The tutorial version does not generate the tangents in the shader as it is faster to read them from the memory.
Bump Mapping
For the Ogre Material file, the bump map needs to be added manually by hand using the texture_bump parameter as follows:
texture Texture\masterchief_base.tif
texture_bump Texture\masterchief_bump_DISPLACEMENT.bmp
Ambient Texture Map
Same here. For the Ogre Material file, the ambient map needs to be added manually by hand using the texture_ambient parameter.
Environment Mapping
Environment mapping can be switched on in the material file using the following parameter:
env_map spherical
Screenshot of the settings in the OGRE exporter for Maya:

Commands to convert the OGRE binary to XML with 5 LODs
..\ogre_xml_converter\OgreXMLConverter.exe halo.mesh tmp\tmp.xml
..\ogre_xml_converter\OgreXMLConverter.exe -l 5 tmp\tmp.xml tmp\tmp.mesh
..\ogre_xml_converter\OgreXMLConverter.exe tmp\tmp.mesh halo.mesh.xml
..\ogre_xml_converter\OgreXMLConverter.exe halo.skeleton halo.skeleton.xml
Summary of the Code Structure:
Main.h :
Main.h :
- Main code
- Reads .mesh.xml & .material files
- Animation is optional
- If an animation is present, it is stored in the animation variable
- Per vertex, the following parameters are stored: position xyz, normal, texture UV, tangent, tangent handedness, 3x skin weight and 3x bone index.
- Bones are stored in the vertex shader as matrix palette (100 bones max)
MeshAnimation.h :
- Reads .skeleton.xml
- Bones are stored in the bones array
- Animations are stored as tracks of keyframes for each animated bone
- After reading the animation, it is resampled to 20 frames per second
- To set an animation, the skeleton matrices are computed by traversing the structure
- Afterwards, they are multiplied with the inverse skinning matrix before passing to the shader (could be precalculated)
- Interpolation is linear so far - slerp could be added for better transitions.
Download
Get the ZIP here [ Download Source & Binary Files ] .
The skinned character is included as rigged Maya binary file & obj file.
You can find more free characters for example here.

Abonnieren
Posts (Atom)
